....AND IT IS LESS THAN LAST YEAR!!!!
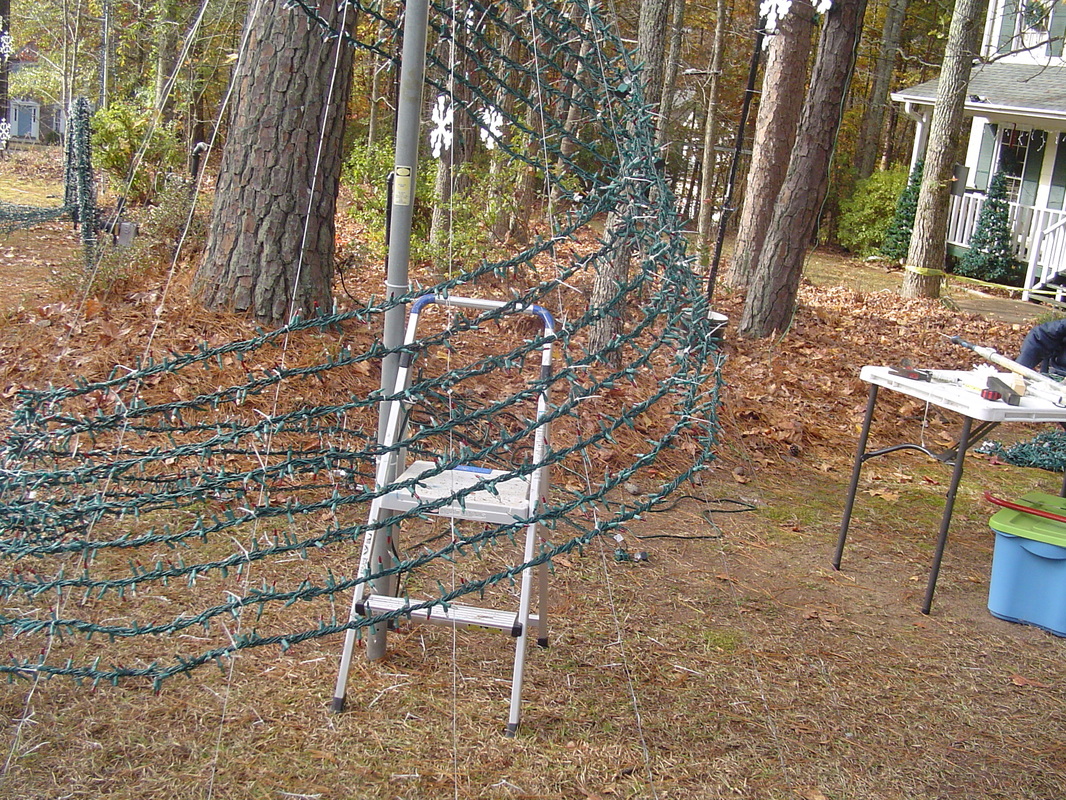
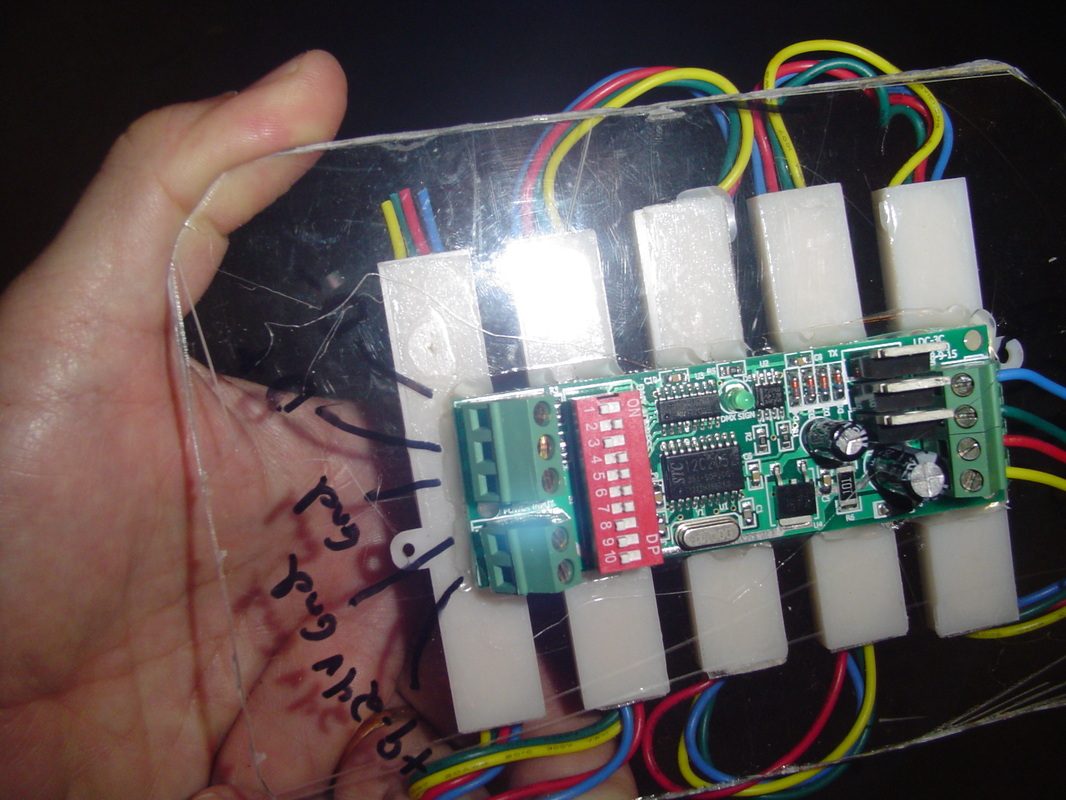
Let's see... I changed out the Christmas Trees up against the house with Green LED's. Honestly...I didn't think it was that much. The C9's last year were all LED's , but changed to strip LED lights...running on a DC power supply. Mmmmmm. I added more incan.s on the mega tree (2,400) and added the spiral tree. (6400) I kept them flashing.... but man. This really happened back in the first of December. Interestingly enough, I saw this thread at Tacky Light Tour. I didn't email ABC up front. They emailed me and wanted me to give them a phone call. Interesting... They were very nice and seemed very excited to get all of our info. Still don't know yet if we have been chosen yet as of this date. (go back and click on the "thread" link to see what I am talking about) It would be REALLY neat if we do get on. This will definitely change a few things about the display if we do get chosen. I don't expect to win...but it would be neat to get on there. Fingers crossed. Below is the YouTube application we had to turn in. They told us to "Ham It Up" and don't be shy. Kind of made a fool out of myself I guess ;-) Again as I have mentioned before, some of this blog is just notes for myself. Hopefully this will help others in similar situations.
Last Show Started taking parts of the display down on Jan. 3rd. *Thought* I was going to run the last show was going to be New Year's Eve. Watch the very last song, Disney's Believe In The Holiday Magic (which is my favorite and I will be keeping it forever ;-) Lots of different songs and just makes me think of DISNEY every time I see it.) "Made my tummy happy" (as my daughter says...) when I watched it, but was sad to see my "Show Closer" come up knowing almost a full year of work was about to come to an end. Always sad to see the show end, but you REALLY want to get everything down and away...once that process starts. Thinking...need a break...but more stuff comes your way to make the brain start thinking for next year. More on that in a moment. I mentioned that *Thought* it was the last show...well...it rained later that night. So I waited since I didn't want to put stuff away wet. So, I ran the show on Jan.1st as well. Misting rain. Show ran fine. Started raining harder and harder. Finally a GFCI tripped. The one plug I took out (GFCI) didn't trip. I WILL BE TAKING OUT THOSE GFCI'S TO FIX THAT PROBLEM. I don't suggest it, but honestly...am tired of this happening. Few Thoughts For Next Year I may be going to some type of Coro Tree or some other types of trees. Another solution is also a totally re-imagined type of plexiglass type of tree. This last one REALLY has some neat stuff that is over the top. Fountains and all. Either way...it would be a huge undertaking which will require me to really start early on the display. I know these post go in reverse order...so I will mention if your reading this one...go back to the "ABC Emailed Us!" thread. Be Patient On Christmas Sales... This year and last year....seemed like there were NO lights after Christmas in the big box stores OR the Drug Stores. Last year I did score BIG on green LED's from Walgreens. (Those are great lights!) I think that most just didn't buy as many lights at the first of the season. Anyway, I found at 75% off several different Christmas trees. These were 4 foot white trees at $6.50 a piece. My thinking is that they would take the place of my "Twig" or "Holdman" trees. I could do something with the RGB modules and maybe some 3 channel controllers. Here is where I got the idea at over at Holidaycoro.com. I could use some "dumb pixels" and this controller and do basically the same thing with a lot less amp pull. So I have 5 of those trees and hope to get one or 2 of the 6 foot trees. I may grab one of the small 3 foot trees at $5.00...and see what white paint does for it ;-) If that works...I can find TONS of the green trees at yard sales. Really opens things up. Good deal though on the other trees. Found at LOWE'S som "FlexTech" strips for $15.00 a piece. Got 4 of them. Trying to find out if they are hackable. This would replace my arches. BTW, I have the solid white ones. The multi color ones will not change colors in individual pixels. Also picked up a "Twig Tree" for $25.00 at Lowe's. Wouldn't have if I knew about the Walmart deal....but got it before going to Wally World. Will sell that one just to make money back if the RGB trees work out. Passing Thoughts... Be sure and look at after Christmas sales for GREEN EXTENSION CORDS. They always go on sale and do not get snatched up quickly. Have gotten several more. Never can have too many extension cords. Take your display down slowly. Don't know about you, but with me...gives me more time to think things through for next year. Write things down. Label EVERYTHING. Take inventory of what you have and where you store it. Your lucky if you get to store everything in one place....that is not me :-( Another thought on packing... I have taken all my extension cords that go with a certain prop and am storing it with that prop. Even though it is labeled, it will make for easier setup when everything is right there together. This will even include the lights that I took off my Christmas trees against the house. There are tons of places and people who have put out tutorials on how to do a spiral tree. One video I found to be very helpful is this one from this website. But a couple of thoughts that are petty, but you might not think about. First, I found it easier to work from the inside of the tree at first. My tree was only about 10ft tall. I used a step stool to reach the top. It's not shown in this picture, is the top of the tree. You can see some of it towards the beginning of this video; The way it wraps around, you have to zip tie it at the top. With the curve of the tree, you can't hardly reach it with a ladder. I just found this easier to do with a shorter 10ft spiral tree. In this next picture, I show the stakes that like are used in the Brown Christmas video. Not sure if he shows it or not. I wrap mine around a couple of times (around the stake) and wrap it back up the line. Holds better. I have seen this mentioned in a few places before. I just thought it was worth mentioning again. To get your stakes out evenly (stakes...huh?....Watch the first video in this post)...take a string, tie it around the pole, mark it on the string...the number of feet you want it out from the pole. You want a 8ft round base...measure out 4ft...etc.
I like the Rainbow Flood lights I have, but I think these are easier...and cheaper; I took a piece of acrylic, measured it out over the gutted flood light (look to some much earlier post on gutting a flood light for my Rainbow Floods) and dropped this in. I know Holiday Coro sells these with several more RGB modules...but this is PLENTY bright. In the next picture you will see one of the 3 channel dmx controllers; I just hot glued this onto the back of the glass. Worked great and easy to work on, if you don't set the dmx address correctly ;-) (I should know :-) The RGB modules can be found in many places. Ray Wu's store in China is one. David over at Holiday Coro is another.
Have several things that I added this year. The first was the strip RGB lights you might have seen in an earlier blog (if not...scroll down to see those). With those strip lights, I wanted to put these on the dormer windows as well. The only issue there was the fact, I am not fond of heights. Also, I don't have a ladder tall enough to reach the top roof of the dormer windows. So I devised a way of making a frame made of pvc along with a "holder" in the middle of the frame. I had several pipes that were made of aluminum and long enough to reach the top of the dormer. Take a look at this picture but notice the little pipe pointing down at the top of the triangle of the dormer roof. What I did was to take the pipe (wish I had taken a picture of this...), balance the whole frame on the end of the pipe you see in the bottom of the picture and pick up the whole frame. Then I just plopped it down on the roof. You can see it actually hangs off the window. So what. It looks fine straight on and from the street. Go back and watch the videos or look at the picture gallery. You can't even tell ;-) In this next picture you can also see the standoffs I used. You can also see a better picture of the pipe that I used to hoist it up onto the roof. Take a look at the pipes off on the side. Those are adjustable. Look at the 2nd picture and you can see they are just snapped into place and can even be moved from the ground. Those couplings are available, I believe from Lowes. I just found those to be tighter fit than cutting them. Just what ever diameter you are using, go through the department and look for this type of fitting...and try to snap it on. Might be easier than cutting one yourself. Below is a video in taking this off the roof with the pipe. Real easy put up and take down. So much "stuff" I need to type down here, if nothing else but for me to look back on. If you are a "Newbie" and are reading this....DOCUMENT EVERYTHING! It will all run together in your brain at the first of the season if you don't! This season has been so weird. I think because we didn't get out of school (I teach if you didn't know) until the 21st of Dec. That is the latest I can ever remember us getting out for Christmas. That in turn, kept some of the traffic down. After that last Friday, traffic picked up 3 or 4 times the amount we had during the days leading up to Christmas. I think families could finally go out and do FAMILY STUFF when the kids were out (are people from the BOE reading this!). Things have gone pretty good over all. Not too many issues. Had one arch break 2 times in the same spot! The coupling had broken and I had to use a wooden dowel to put the 2 pieces together (mine are in 2 pieces unlike others who do one...look on the project pages for pics). I was stupid and didn't push the dowel far enough down...and it snapped the little end off. Fixed with another...and everything is fine. Had my red mini trees pop the breaker in a fine steady mist. That was frustrating. However, it was towards the end of the show...but still had 2 cars out front when I had to shut it down...Errrrr. Took that stupid GFI out the next day for a regular plug. Yeah, yeah. I know. But I don't think it popped in a steady rain the other night. When I was out of town, monitored on Ustream. That was pretty cool. Want to get a webcam for sure for next years show. Have lots of stuff to post and project pics to post. Freezing cold today, but hope to get some display daytime shots today and tomorrow. Might regret running it through New Years this year. Suppose to rain New Years day and a few after that. Oh well. Just have to remember to take my time in taking everything down. (Newbies....NEVER take stuff down without labeling boxes and testing elements to make sure they are working. You will regret it next Christmas if you don't!!!
With school JUST NOW getting out, it really seems like it was a short season...or the season has just FLOWN by. Either way, I really need to go back and post some project blogs and some other passing thoughts.
The "Toys For Tots" has really been awesome this year. Gone from maybe a couple of toys last year (it was very late when we started) to probably 3 or 4 box fulls of toys. (This is a really big box too, like what you see in the stores) I did "Light It Up" this year and added some big banners. I think that has helped too. Tonight, I was trying to finish up "All I Want For Christmas Is You". (Just on a whim I thought I would throw this in) Had been sitting for hours, so I got up...walked around...and thought I would check the "Box". I had gone a couple of matchbox cars out earlier, but when I looked tonight...WOW! The box was full of stuffed animals! Could not believe it. I will take these by Publix now since their drive ends tomorrow! Anyway...this is just really cool. ANOTHER REASON WHY I DO THESE LIGHTS! Really makes you feel good to collect for this charity. Need to add another next year! Didn't realize that the last post was back in JULY! If you are reading this (or for myself later...) I will be posting more stuff after we go "LIVE" with the show in just a few short days.
It is 6am Sunday morning. That is not unusual for me on a Sunday morning. What is unusual is the fact I have been up almost every day this week at 3 and 4am (normally get up at 5am during the work week) to sequence. Honestly, not even to sequence...just to change over sequences. I will post some of the stuff from Halloween, since I really added a good bit from last year. Thought I was going to be ahead in having so much stuff done ahead of time. Maybe I am. We will know in a few days. I honestly had hoped to have EVERYTHING done by now...but no. Few Quick Lessons learned before I go back to moving sequences over from last year's setup; You can never start to early. Especially on sequencing. Probably won't be able to do but maybe ONE new chart because I started so late. If you do a Halloween show, incorporate as much as possible into that show for your Christmas Show. Maybe.....every single Christmas Tree will be GHOST next year ;-) Take better notes! For example, I started putting up my "Spiral Tree". Well I had plans on incorporating a new design that one fellow here in GA used. Went into a panic when I couldn't see how in the world I was going to get the strands up on the tree without a taller ladder. Found a forum topic I had been a part in and then it hit me....YOU WERE GOING TO DO THAT TOO! Oh well. It has been awhile since I have posted about the RGB strips. I think I found a really neat solution for not only mounting these "Dumb Strips" (ones where the entire strip can be controlled, not the individual pixels) but for running them as well. Below is a sample of what it will look like on my gutters for Halloween and Christmas. Please note, the programming is not perfect for the gutter on the carport or one closest the camera; They are REALLY bright! If you look at the individual LED's (5050) in the post below, you can see the spacing. In the video, it doesn't show. From the street, you can see the individual LED's. Anyway these were cut down from 16ft sections into 10 individual channels. Here is how they are broken down; Wow. Didn't realize how small this was going to be. Anyway it is broken down into 4 sections on the top gutter and porch gutter. 2 sections on the carport gutter. *I May* add 2 more on the gables not shown in the picture, but can be seen just a little bit in the video. The only issue there is, I do not have a ladder tall enough to get up to the gables! ;-) Mounting these RGB strips just made plain sense to mount them on PVC. These strips actually came with an adhesive backing. That made for QUICK and easy install on the pipes. After that I went back and zipped tied in between the little LED's on the "seams". That way it wouldn't cut into any cap.s or LED's. I used the black text that is on every piece of pvc (kind of pipe it is, make, scan bar, etc.) to line it up straight. Again, easy install. Kind of hard to see but I used "Heat Shrink" on the exposed ends of every strip. As you will later see, I also used it for the smaller wires within the strips and connectors as well. Each pipe is cut down to about 6 to 8ft sections. This is what makes up the 10 different strips I am using. At the end of each section I use a 1" coupling. This coupling has a slit in it to accompany the strip; On some of the pipe ends I also cut a groove out so the RGB strip could go inside the pipe; In using the couplings you will see that the pipes fit flush. I wanted a way for the RGB strips to go inside the pipes. This way all the wiring would go inside the pipes that goes to the controllers. In this picture, you will see that the "taped" end (I used heat shrink on everyone...but that one :-( ) goes into the pipe; So the wiring for the upper and lower gutters went like this; [Strip One >>>>>][Strip Two>>>>>>>>>>][Strip Three>>>>>>>>>][Strip 4>>>>>>] Pipe..............Strip 1 wire inside pipe....Strip 1&2 inside.....1,2,3 inside... Then at the very end you would 4 sets of wires for that gutter going to the controller. All wires hidden onto the end and then down to the porch. Notice the "Wall Tie" ("Wall Ties" are explained below) and how it is looped around. It is in between the 2 LED's so as not to block the light. Then it goes up over the gutter. I took my hand (with a gloove on for protection...remember it is sharp!) and gripped the side with the pipe and then gripped the backside so as to grip the gutter. This made for a tight fit that held up REAL well for several weeks. I honestly think it could have stayed up forever. Not notice the slotted coupling. Notice that it is just small enough for the strip to go between. I tried spacing these so the LED spacing was just like it was on the strip. Hopefully that would help with gaps. Next couple of pictures shows how straight this whole process keeps the pvc pipe and strips. Notice the backside of the gutter and the little lip. I was able to use that lip to keep a tight grip and not let it move during windy times. Pictures aren't the best, but gives you an idea; To mount these I used "Wall Ties" from Lowe's. Be careful with these...THEY ARE SHARP!!! I bent these into a "J" or really almost a "S". They come in a box of 100. I used 3 per 6 to 8ft section. Worked great! Easy Storage! I actually have these hanging in my garage. Notice all the wire. That is Cat5. There was a thread I was involved in on Planet Christmas forum about the length of wire and whether this would work. This worked GREAT! No issues. Lots of wire and no real loss of power that I could tell. Notice the little connectors on the Cat5 cable and the pvc pipes. I love these things! These water-proof connectors can be found from several different vendors. I actually found out as well, there are different versions of these. Hard to tell, but the one on the right has a SLOT for the KEY to mate up with the one on the left. This varies from model to model. Just be aware if your mixing and matching. I found the cheapest buy here. That place does group buys, so they may run out. Another source can be found here. Be careful what you are buying though. "Pixels" can be ran with 3-wire setups while the "Dumb Strip" that you see here need the 4 wire connectors. The DMX Controllers I decided to use was the 27 Channel DMX DC Controller. I found this article on "Light Up Lawerence" which had a great explanation about this controller; MUCH, MUCH better pictures can be found on the "Light Up Lawerence" site. I would click on that link and look at that if you are interested in this kind of controller. Ironic thing (as you will see there), this is much cheaper than the LOR DC controller. The only thing is (to my understanding) is that this will not "Shimmer" or "Twinkle". I believe that this is a fault of dmx. However you could probably simulate that function (which I probably will need to in converting some of my sequences.). In putting this in some sort of box....I decided to go with just a Tupperware box; After that, put some holes in it (with a drill) for the dongles and the wiring. Just used Cat5 jumpers for the wires out; I also used the wiring scheme from "Light Up Lawerence" The 3 Channel DMX Controller seemed to fit the bill to add the extra strip that I needed. This can be bought at Holiday Coro. I ended up using the dmx out from the 27 channel controller and going to my 3 channel dmx controller; This was just tacked onto the end of the last RGB strip pipe. As David mentions in the video about the 3 channel dmx controller I just used the 1" pvc pipe with caps. After adjusting the dmx address needed, I will chalk the holes on the ends for water proofing;
|
Please Read
Click on the September archive and then click on comments to see all of the 2009 display blogs. I am going to start blogging with a "Title" and also put the post into the blog so it can be archived by month. Should have done that to begin with. If you are new to this world of "Animated Displays", I suggest you not only read mine, but other blogs. They will help you learn NOT to make the same mistakes others have. Archives
January 2014
Categories
All
|